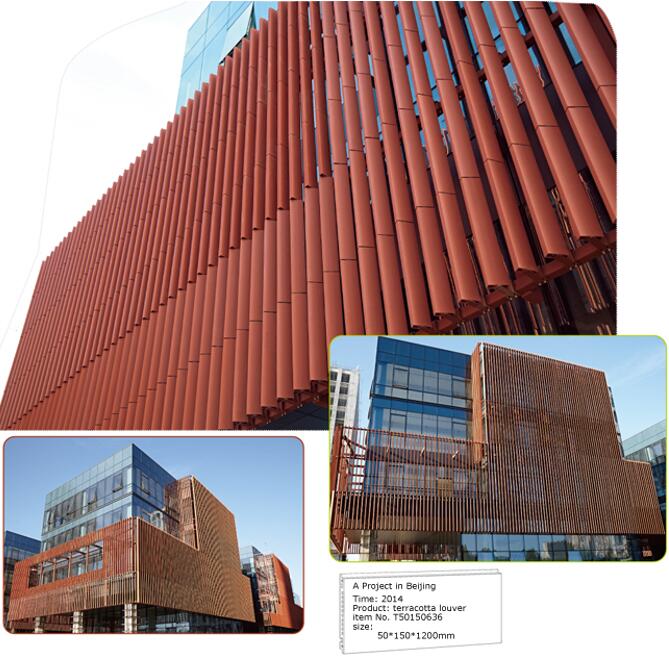
Terracotta Facade Panel Features to Define in a Specification
Define terracotta facade panel features for a project specification, including format, surface, color range, joints, fixing interfaces and evidence.
Historical archive: product availability, standards and event information may have changed. Contact LOPO for current specifications.Terracotta facade panel features become useful specification language only when they are measurable, illustrated and connected to the proposed wall assembly. A clear schedule should identify the panel format, orientation, profile, surface, color range, joint treatment and fixing interface. It should also state which samples, drawings and test evidence must be submitted for review.
This article is a specification checklist, not a claim that one product is suitable for every facade. Begin with the current terracotta panel range, then verify each selected option against the project’s design, engineering, exposure, code and procurement requirements.
Separate panel features from assembly performance
A terracotta panel is one component in an exterior wall. Brackets, rails, anchors, joints, cavity, insulation, membranes, flashings, openings and the supporting structure all affect the completed facade. Product data can describe a panel, but it cannot by itself establish the structural, fire, water, thermal or acoustic performance of the full assembly.
The architect and engineers should define the applicable criteria and responsibilities. The supplier can then respond with product-specific information, samples and relevant evidence. This distinction keeps a specification testable and avoids broad statements that cannot be applied to a particular building.
Terracotta facade panel specification features
| Feature | What to define | What to review |
|---|---|---|
| Format | Panel width, height, depth, orientation and module | Dimensioned drawings, tolerances and facade grid |
| Profile | Flat, grooved, ribbed or project-specific face geometry | Section drawings, shadow effect and cleaning access |
| Surface | Finish name, texture, sheen and directional character | Representative physical samples |
| Color | Target family and acceptable range of variation | Multiple samples and a larger sample area |
| Edges and joints | Edge form, joint width, joint alignment and visible backing | Elevation, sections and corner details |
| Fixing interface | Panel engagement, rail or bracket relationship and adjustment | Coordinated system details and calculations |
| Evidence | Project-required properties and applicable test methods | Reports that clearly represent the proposed product |
Format, orientation and profile
State panel dimensions and orientation rather than using terms such as standard or large format without definition. Coordinate the module with floor lines, openings, corners and movement joints. If several sizes are used, provide a panel schedule or coded elevation so the intended distribution is unambiguous.
Face geometry should be shown in section. Grooves and ribs can change the shadow pattern and apparent color, while deeper profiles may require additional coordination at corners, flashings and access points. Confirm which surfaces are visible and whether cut edges or ends require a specific treatment.
Surface and color range
A finish name alone rarely communicates the full visual result. Specify texture, sheen, direction and the intended viewing distance. LOPO’s overview of panel surfaces and textures can support early selection, but physical samples should control the project approval.
Fired-clay appearance can include a deliberate range rather than a single uniform tone. Use the terracotta panel color list to identify candidates, then define the acceptable range with several representative pieces. A full-size or multi-panel mockup helps the team judge color distribution, joint rhythm and changing light together.
Edges, joints and facade transitions
Joint design is a system decision. Draw horizontal and vertical joints, their alignment, the visible material behind them and how water is managed in the assembly. Coordinate interfaces at windows, doors, parapets, bases, corners and changes of material. The drawings should also identify where panels terminate or require special geometry.
Avoid asking the installer to resolve every transition after production begins. Early details allow the design team, supplier and facade engineer to identify conflicts among the panel module, support system, tolerances and site sequence.
Fixing interface and adjustability
Define how the selected panel engages with its supports and how construction tolerances will be accommodated. Information about LOPO back-fixing components may help a team understand available interfaces, but the final attachment design must be coordinated for the actual substrate, loads, cavity and regulatory context.
Submittal drawings should show panel sections, engagement points, rails or brackets, fasteners, movement provisions, cavity clearances and critical edge distances as applicable. Calculations and testing should follow the criteria established by the responsible engineer and specification.
Evidence, samples and quality records
List the properties that require evidence instead of requesting a generic certificate. Depending on the project, the design team may need information concerning dimensions, water-related behavior, strength, durability, reaction to fire or other characteristics. Applicable standards and acceptance limits vary, so they must be named by the project team.
Check that every document can be connected to the proposed panel body, format, finish and manufacturing route. Record approved samples, drawings and mockups. During production and delivery, consistent identification helps the site team compare received material with the approved submittal.
Specification and submittal checklist
- Panel product reference, format, orientation and facade module
- Face profile, exposed surfaces, edge form and special pieces
- Surface finish, color family and acceptable variation range
- Joint layout, corners, openings and transitions to other materials
- Fixing interface, support responsibilities and adjustment strategy
- Required reports, drawings, calculations, samples and mockup
- Panel schedule, labeling, packaging, delivery sequence and spare material
Send the design intent, elevations, sections, required standards and delivery location through LOPO’s project enquiry page. The resulting response should be reviewed as part of the coordinated facade specification, not as a substitute for project engineering.
Frequently asked questions
Which terracotta panel feature should be selected first?
Start with the facade module and wall assembly. Format, orientation and fixing interface set important constraints; color and texture can then be evaluated within a technically workable range.
Should a specification require perfectly uniform color?
Not automatically. If variation is expected or desired, define an acceptable range using representative physical samples and an approved mockup rather than a single image or vague wording.
Does a panel test report prove the performance of the complete wall?
No. A product report addresses the specimen and method stated in that document. Complete-wall performance depends on the designed assembly and may require separate engineering, testing or assessment.
What should a terracotta panel sample submission include?
Include the selected format, profile, surface, color range and exposed edges, together with drawings and product-specific evidence required by the specification. Use several pieces when variation matters.